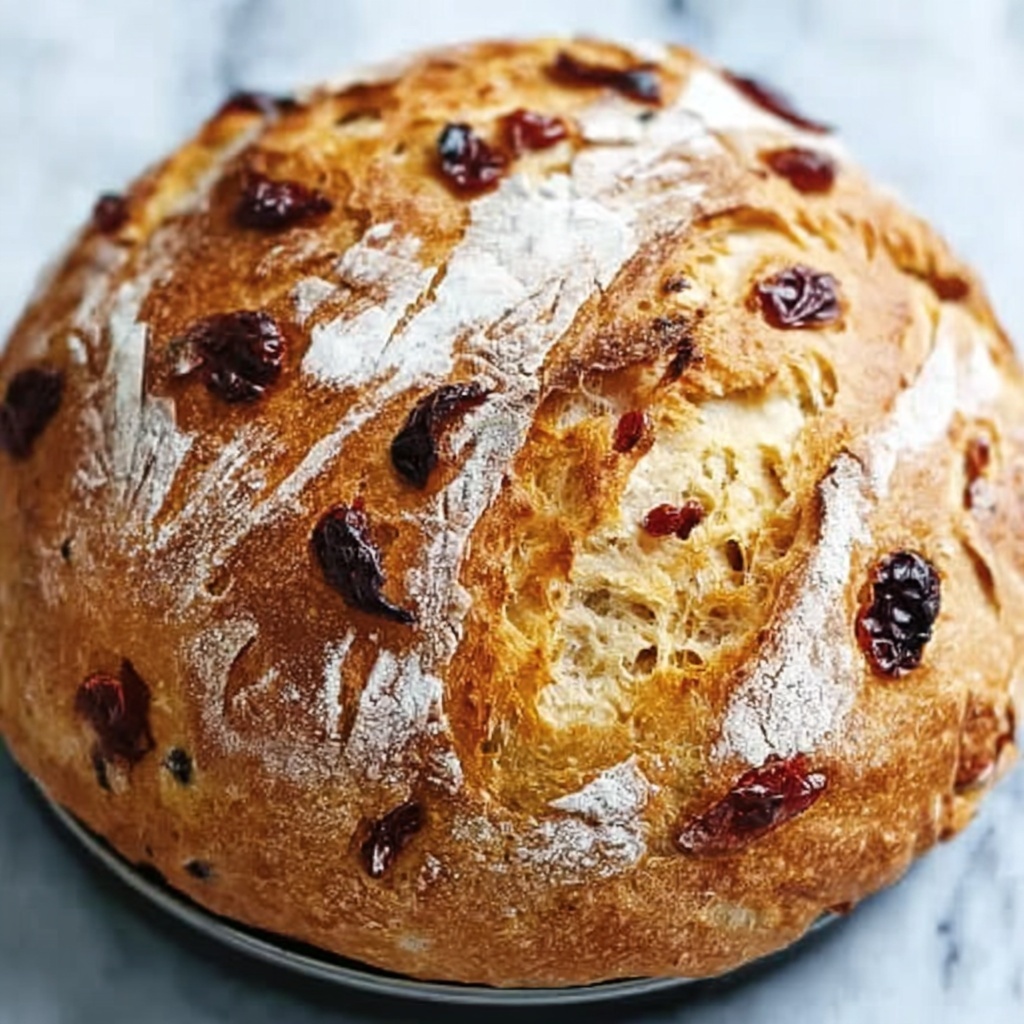
If you have been searching for a comforting, homemade bread that ticks all the boxes of flavor, texture, and ease, you will adore this No Knead Cinnamon Raisin Bread Recipe. This bread captures the warmth and sweetness of cinnamon and raisins beautifully, wrapped in a wonderfully soft and rustic crust without the hassle of kneading. Its simplicity is brilliant, making it a perfect project for both novice and seasoned bakers who want to enjoy fresh bread with minimal effort. Get ready to transform simple pantry staples into a crowd-pleasing treat that fills your kitchen with cozy aromas and your heart with happiness.
Ingredients You’ll Need
Only a handful of ingredients come together in perfect harmony to create this enticing loaf. Each one plays an essential role, bringing balance to the taste, texture, and visual appeal of your bread, ensuring that every bite is a joy.
- 3 cups all-purpose flour: The foundation of your bread, providing structure and a tender crumb.
- 2 tbsp granulated sugar: Adds a touch of sweetness and helps yeast activation.
- 1 tsp salt: Essential for flavor enhancement and balancing sweetness.
- 1/2 tsp instant yeast: The magic ingredient that makes your dough rise without fuss.
- 1/2 cup raisins: Bursts of fruity sweetness perfectly complement the cinnamon.
- 1 1/4 cups warm water (about 110°F/45°C): Activates yeast and ensures the dough comes together beautifully.
- 1/2 tsp ground cinnamon: Infuses the dough with warm, fragrant spice from the start.
- 2 tbsp brown sugar: Used to create that irresistible cinnamon swirl during shaping.
- 1 tsp ground cinnamon: Works with brown sugar to deliver a rich, aromatic cinnamon layer.
How to Make No Knead Cinnamon Raisin Bread Recipe
Step 1: Mix the Dough
Begin by combining the flour, granulated sugar, salt, instant yeast, raisins, and the 1/2 teaspoon of ground cinnamon in a large bowl. This mix brings together the dry ingredients, making sure the spices and sweetness are perfectly distributed before adding the water. Gradually stir in the warm water until you form a shaggy, sticky dough. Resist the urge to knead—this dough’s strength comes from a long, slow rest.
Step 2: Let the Dough Rest Overnight
Cover the bowl with a clean towel or plastic wrap and leave it at room temperature for 12 to 18 hours. During this time, the dough will bubble and double in size, developing wonderful flavor and a light, airy texture without any kneading.
Step 3: Prepare for Baking
Turn the rested dough onto a floured surface. In a small bowl, mix the brown sugar and the remaining teaspoon of ground cinnamon. Sprinkle this cinnamon sugar mixture evenly over the dough’s surface. Gently fold the dough a few times to incorporate a cinnamon swirl without deflating all the air you’ve lovingly developed.
Step 4: Shape the Dough
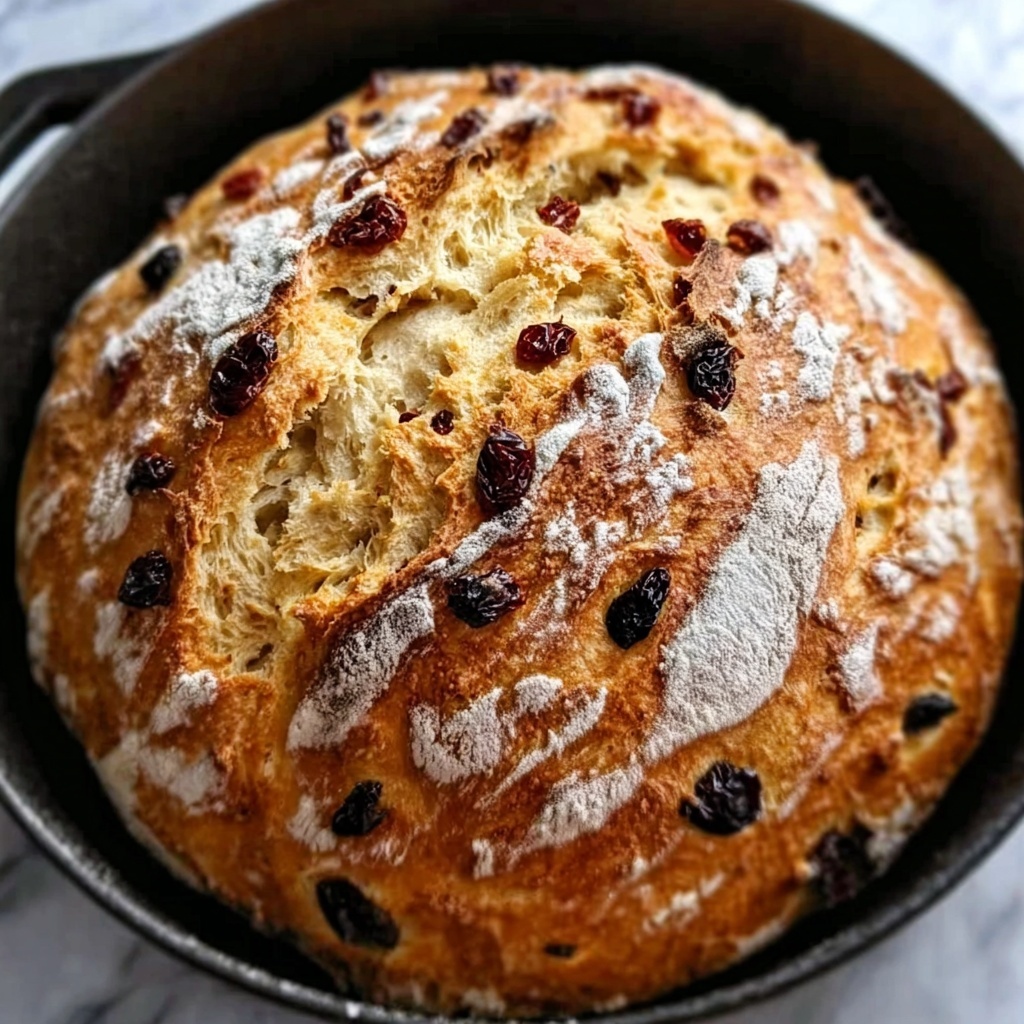
Shape the dough into a round loaf using floured hands. Place it on a piece of parchment paper, cover it once again, and let it rest for 30 to 45 minutes. Meanwhile, preheat your oven to 450°F (230°C) with a Dutch oven inside. The hot Dutch oven will create the perfect steamy environment to bake a crusty loaf.
Step 5: Bake the Bread
Carefully transfer the dough, with the parchment paper, inside the hot Dutch oven. Cover it with the lid and bake for 30 minutes to trap steam, which helps create that crisp crust.
Step 6: Finish Baking
Remove the lid and continue baking uncovered for an additional 10 to 15 minutes, or until the crust is gorgeously golden brown and delightfully crunchy to the touch.
Step 7: Cool and Enjoy
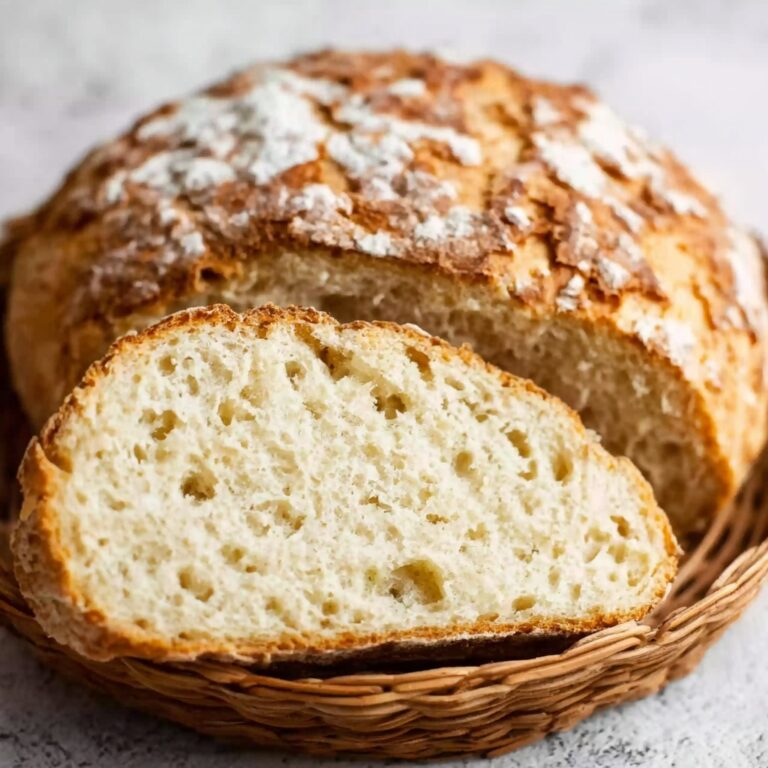
Take the loaf out of the Dutch oven and place it on a wire rack to cool completely. This step is crucial because it allows the crumb to set properly and makes slicing easier. Once cooled, slice and enjoy your freshly baked No Knead Cinnamon Raisin Bread Recipe.
How to Serve No Knead Cinnamon Raisin Bread Recipe

Garnishes
A simple pat of butter lets the comforting flavors of the bread shine, while a drizzle of honey or a spread of cream cheese can elevate each slice to something truly special. A sprinkle of powdered sugar or a light dusting of cinnamon sugar adds a pretty finishing touch that’s as pleasing to the eye as it is to the palate.
Side Dishes
This bread pairs wonderfully with a warm bowl of spiced apple cider or a cup of your favorite tea or coffee for breakfast or an afternoon snack. It also complements creamy soups like butternut squash or hearty chilies, making it a versatile side for lunch or dinner too.
Creative Ways to Present
Use the No Knead Cinnamon Raisin Bread Recipe as a base for French toast—its cinnamon and raisin swirls add natural sweetness and texture. Or serve it as toast topped with ricotta, fresh fruit, and a drizzle of maple syrup for a stunning brunch option. The rustic appearance also makes it perfect for slicing into small cubes to create a bread pudding or a festive bread basket.
Make Ahead and Storage
Storing Leftovers
Once completely cooled, store your bread wrapped tightly in plastic wrap or in an airtight container at room temperature. It will stay fresh and soft for 2 to 3 days, perfect for quick snacks or sandwiches.
Freezing
This bread freezes wonderfully. Wrap it well in plastic wrap, then place it in a freezer bag or airtight container. It will keep for up to 3 months. When you’re ready to enjoy, thaw at room temperature or heat gently in the oven.
Reheating
To revive the fresh-baked taste and texture, warm slices in a toaster or oven at 350°F (175°C) for 5 to 10 minutes. This warms the bread through and crisps up the outer crust, making it taste like it just came out of the oven again.
FAQs
Can I use instant yeast for this recipe?
Yes! This No Knead Cinnamon Raisin Bread Recipe specifically calls for instant yeast because it works quickly and doesn’t require proofing, simplifying the baking process.
Do I really have to wait 12-18 hours for the dough to rise?
Absolutely. The long, slow rise is what develops the deep flavors and beautiful texture in the bread without kneading. It’s worth the wait for the amazing result!
Can I substitute raisins with other dried fruits?
Definitely. Dried cranberries, chopped dried apricots, or even chopped dates would be delicious alternatives, adding their own unique sweetness and texture.
What if I don’t have a Dutch oven?
You can bake this bread on a heavy baking sheet. Place a pan of water on the oven floor to create steam, which helps form the crust, but the Dutch oven is the best tool for producing perfect crust and crumb.
Is this bread gluten-free?
This recipe uses all-purpose flour and is not gluten-free. For a gluten-free version, special flours and adjustments would be necessary, but this No Knead Cinnamon Raisin Bread Recipe is best enjoyed with traditional wheat flour.
Final Thoughts
I promise this No Knead Cinnamon Raisin Bread Recipe will quickly become one of your favorite go-to breads when you want a cozy, flavorful treat with very little effort. Its no-knead simplicity combined with the warm cinnamon and fruity raisins makes it irresistible whether fresh from the oven or toasted the next day. Give it a try, and I’m sure it will fill your home with joy and your heart with pride in your baking skills.
Print
No Knead Cinnamon Raisin Bread Recipe
- Prep Time: 20 minutes
- Cook Time: 40-45 minutes
- Total Time: 12 hours 65 minutes
- Yield: 12 servings
- Category: Bread
- Method: Baking
- Cuisine: American
Description
This no-knead cinnamon raisin bread is a simple yet flavorful homemade loaf featuring a delicate cinnamon swirl and sweet raisins throughout. Made with minimal effort, this recipe relies on a long fermentation for flavor and texture, then baking in a hot Dutch oven for a crusty finish.
Ingredients
Dough Ingredients
- 3 cups all-purpose flour
- 2 tbsp granulated sugar
- 1 tsp salt
- 1/2 tsp instant yeast
- 1/2 cup raisins
- 1 1/4 cups warm water (about 110°F/45°C)
- 1/2 tsp ground cinnamon
Cinnamon Sugar Mixture
- 2 tbsp brown sugar
- 1 tsp ground cinnamon
Instructions
- Mix the Dough: In a large bowl, combine the flour, granulated sugar, salt, instant yeast, raisins, and ground cinnamon. Stir these dry ingredients together.
- Add Water and Rest: Gradually pour in the warm water while stirring to form a shaggy dough. Cover the bowl and let the dough rest at room temperature for 12 to 18 hours until it is bubbly and has doubled in size.
- Prepare for Baking: Turn the rested dough onto a floured surface. Evenly sprinkle the cinnamon sugar mixture (brown sugar and cinnamon) over the dough.
- Incorporate Cinnamon Swirl: Gently fold the dough a few times to distribute the cinnamon and brown sugar throughout, creating a cinnamon swirl effect.
- Shape the Dough: Form the dough into a round loaf and place it on a piece of parchment paper. Cover it and let it rest for 30 to 45 minutes while you preheat your oven to 450°F (230°C) with a Dutch oven inside to heat.
- Bake the Bread: Carefully transfer the dough on the parchment paper into the preheated Dutch oven. Cover with the lid and bake for 30 minutes.
- Finish Baking: Remove the lid and continue baking the bread for another 10 to 15 minutes until the crust is golden brown and beautifully crisp.
- Cool and Serve: Remove the bread from the Dutch oven and cool it on a wire rack before slicing. This helps the bread set and prevents sogginess.
Notes
- Use warm water around 110°F (45°C) to activate the yeast without killing it.
- The long resting time develops flavor and texture, so don’t rush it.
- Preheating the Dutch oven ensures a steamy environment inside for a perfect crust.
- The cinnamon and brown sugar swirl adds a delicious sweetness and aroma.
- Allow the bread to cool completely before slicing to avoid a gummy texture.


